Category: Dairy Free

Gingerbread Smoothie

If it’s warm for Christmas, like it is here in San Diego, I’ll be enjoying some pickleball and a nice refreshing treat after. Like this healthy vegan gingerbread smoothie.

It tastes like a cookie but it’s made with cauliflower and banana for lots of nutrients. It’s also packed with flavor from all the spices. I hope you enjoy this deliciously unique treat!  

Serves 2

gingerbread smoothie

Ingredients

  • 1 cup chef v almond or oat milk
  • 1 tbsp chef v vanilla protein (or pea protein of your choice)
  • 1 cup frozen cauliflower chopped or riced 
  • 1 frozen ripe banana
  • 1 tbsp almond butter
  • 1 tbsp coconut nectar 
  • 1/2 tsp cinnamon
  • 1/2 tsp grated fresh ginger
  • 1/8 tsp allspice
  • A pinch sea salt
  • 1 cup ice 

Directions

Blend all ingredients together in a vitamix or blender for 1-2 minutes until blended smooth. I like to top with a tiny cinnamon and I found these super cute mug cookies to decorate with! 

gingerbread smoothie

Warm Butternut Squash Salad

Warm butternut squash: this is a delicious holiday treat for those first cold days that signal the end of fall. It’s a hit at special dinners. It’s very filling and makes you feel warm inside even though it’s a salad. It’s also very healthy and vegan. – Veronica

DOWNLOAD PDF

warm butternut salad

TOTAL 30 minutes

Serving Size: 2-4 people

Ingredients

Warm butternut squash

  • 1 Tablespoon coconut oil
  • 1/4 cup diced sweet or yellow onion
  • 1 small butternut squash,
seeded and diced
  • 1 clove garlic, minced or pressed
  • 1/2 teaspoon ground nutmeg
  • 1/2 teaspoon fresh thyme leaves
  • 1 cup cooked quinoa
  • Sea salt, to taste
  • Freshly ground black pepper
  • 4 cups wild greens (arugula, spinach, or mixed herbs)
  • 1 cup pomegranate seeds

Directions

Warm butternut squash: In a large non-stick pan, heat the coconut oil over medium heat. Add the diced onion and butternut squash. (The smaller the squash is diced the more quickly it will cook.) Sauté the squash and onions over medium heat for about 5 minutes, or until the squash is soft. Do not burn the squash or onions.

Add the garlic, nutmeg and thyme, and cook for 1 to 2 minutes more. Transfer the butternut squash to a bowl and stir in the cooked quinoa. Add salt and pepper to taste. Cool mixture in the refrigerator.

To serve, mix the dressing ingredients and drizzle over greens. Top with cooled butternut squash mix and garnish with pomegranate seeds. Serves 2-4.

Grilled Artichokes with Two Sauces

Grilled artichokes, precooked and finished at the picnic. They’ll love these on the barbecue. Serve with my two vegan sauces:  Raw Horseradish Mayonnaise, and  Vegan Herb Aioli.

grilled artichokes

Serving Size: 2 People

Ingredients

  • 6 cups filtered water
  • 1 large fresh artichoke
  • 2 cloves garlic, peeled
  • 1/2 white onion
  • 1/2 lemon, juiced
  • 1 teaspoon apple cider vinegar
  • Sea salt and freshly ground black pepper, to taste

Directions

Bring the 6 cups of water to a boil in a stockpot.

Trim the thorns from the artichoke leaves with scissors. Cut the artichoke in half vertically and remove the fuzzy center. To the boiling water, added the artichoke, garlic, and onion. Boil, covered, for 45 minutes – one hour, or until the leaves pull out easily. Transfer the artichoke halves to a paper towel cut side down or drain the water.

Heat a grill or grill pan. Place the artichokes cut side down on the hot grill or grill pan and char for 2 to 3 minutes, until you get good grill marks. This will add a nice smokiness. Plate the artichoke halves cut side up. In a small bowl, whisk the lemon juice and vinegar, drizzle over the artichoke, sprinkle with sea salt and pepper, and serve with Vegan Herb Aioli or Raw Horseradish Mayo.

Raw Caramel Cheesecake

This is my interpretation of a New York cheesecake. I’ve swapped the traditional cream cheese for a delicious mixture of cashews, coconut, and vanilla.

You will need to make this cake in 2 steps, and give yourself 24 hours to complete it, since you will need to soak the cashews for at least 2 hours or overnight and will need freezing time for the cake as well.

First make the crust and the “cheese” layers. Once those steps are complete, place the cake in the freezer for four hours or more. The final step is to make the topping and pour it over the chilled cake. You can serve the cake immediately or refrigerate it for up to a week. But I recommend eating it now!

Serve this to the most finicky eater and watch them become a raw food convert!  – Veronica

creamy broccoli soup

Serving Size: 6 People

Ingredients

  • Crust Ingredients:

    • 1 cup slivered almonds
    • 1 cup walnuts
    • 1 cup pre-soaked pitted dates (soaked in water overnight)
    • 1/4 tsp. sea salt
    • 1 tsp. real vanilla extract

    Cheesecake Layer Ingredients:

    • 3 cups pre-soaked cashews (soaked in water overnight)
    • 1⁄4 cup organic coconut oil
    • 1⁄4 cup coconut nectar
    • 1 tsp. real vanilla extract
    • Juice of 1⁄2 a lemon

    Caramel Sauce Ingredients:

    • 1 cup pre-soaked pitted dates (soaked in water overnight)
    • 3 tbsp. coconut nectar
    • 2 tbsp natural almond butter
    • 1/4 tsp. organic sea salt
    • 2 tbsp. coconut oil
    • 1 1/2 tsp. vanilla extract

Directions


Things you will need:

8-inch spring-form pan (bake-ware that sides can be removed
Coconut oil cooking spray (or cold pressed olive oil spray)

Directions:

Soak dates in water overnight. Soak cashews in water overnight. Add all crust ingredients to your vitamix and pulse until blended with still some nutty texture. Spray an 8-inch spring-form pan with healthy non-stick cooking oil.

Spread the crust evenly to cover the entire bottom of the pan. Add the cheesecake layer ingredients to your food processor and blend until completely smooth (scrape down the sides to get all the ingredients). Spread evenly over your crust.

Place in the freezer for at least 3 hours.

Place your Caramel Sauce ingredients into your food processor and blend until completely smooth (scrape down the sides to get all the ingredients).

Remove cheesecake from the freezer. Place the cheesecake on a serving pan.

Remove spring-form sides. Spread the caramel sauce evenly over the cheesecake. Cut into slices, serve and bon appetit!

Creamy Curry Pumpkin Soup

The only thing more comforting than a bowl of soup is a bowl of homemade soup that is both vegan and gluten-free. There’s something special about cooking comforting meals like this during the Fall that will warm you up and have your kitchen smelling festive.

Cozy up with someone you love and enjoy this delicious pumpkin soup on a cool fall night! – Veronica

vegan ambrosia salad

Serving Size:2

Ingredients

  • 1 tbsp. olive oil
  • 1 yellow onion, diced
  • ½ cup organic Crimini mushrooms, sliced
  • 1 clove garlic
  • 1 tsp. curry powder
  • 1 ½ tbsp. gluten-free flour (we like Bob’s Red Mill)
  • 3 cups organic vegetable broth
  • 2 cups Chef V’s Organic Pumpkin Puree (see recipe HERE)
  • ½ cup of canned coconut milk
  • 1 tsp. nutmeg
  • 1 tsp organic sea salt
  • ½ tsp. black pepper

Directions

Bring oil to medium high heat and saute onion and mushrooms for 3 minutes or until onions are translucent.

Add garlic, curry powder and gluten-free flour to the pan to continue to cook for one more minute.

Slowly add the vegetable broth and bring to a boil.

Cook and stir for a couple of minutes until the soup starts to thicken.

Add the pumpkin puree, coconut milk, nutmeg, salt and pepper.

Continue to stir and cook for an additional 5 minutes.

Blend small batches of soup in a Vitamix or blender to a get a smooth texture and serve hot.

Gluten-Free Pie Crust

Gluten-free pie crust – my recipe is so good you can use it for any pie recipes, sweet or savory. It’s a keeper! – Veronica

chia seed egg substitute
gluten free pie crust

Ingredients

  • 2 cups gluten-free flour (I like Bob’s Red Mill)
  • 2 tbsp. raw coconut sugar
  • ½ tsp. organic sea salt
  • 1 tbsp. Chef V’s Chia Seed Egg Substitute
  • 1/3 cup water (add tbsp. more at a time if to dry)
  • 1-cup organic unsweetened almond milk

Directions

Preheat oven for 450°F. In a large mixing bowl, mix flour, salt and sugar. Add coconut oil and mix until crumbly.

Add egg substitute and mix in well, mixture should still be crumbly. Add water by stirring in one tablespoon at a time until the dough holds together for rolling. It is better to be more moist than too dry.

Cut mixture in a half add roll into two balls (one for crust and one for topping). Flour a sheet of parchment paper or wax paper on a flat surface. Shape balls into disc shapes and place on surface.

Cover the dough with an additional piece of wax paper Roll crust out to slightly bigger than your pie tin. Remove the top wax paper, place your hand under the bottom piece of wax paper and turn over into your pie dish.

Slowly remove the wax paper from the top of the crust. If it breaks up just mold it back together. Press edges on crust with a fork to crimp the edges. Pierce bottom slightly with a fork. Add pie mixture.

Coconut Whipped Cream

Use this vegan, gluten-free whipped cream on anything you want to make taste decadently delicious.

coconut whipped cream

Ingredients

  • 1 can full fat coconut milk (refrigerate overnight)
  • 2 tbsp. raw coconut sugar
  • 1 tsp. real organic vanilla extract

Directions

Remove the can of coconut milk from refrigerator very carefully. Make sure not to shake the can at all.

Open slowly and scrape out the top layer of coconut that is creamy (don’t worry if you get a little of the water just try to get only cream).

Place in a mixing bowl with coconut sugar and vanilla extract.

Beat the cream on high for 2 minutes or until it becomes a cream substance. Top on pumpkin pie or anything else your heart desires this holiday!

That’s So Cheesy! Nutritional Yeast

'NOOCH' – The Plant-Based Superfood That Makes It Easy To Give Up Cheese

“There’s no way I can give up cheese!”

If I had a dollar for everytime I heard that one, I could buy a couple pounds of pule. Pule is the most expensive cheese in the world, fetching up to $1,000 per pound. And get this, it doesn’t come from sheep, cows or goats, it comes from … wait for it … donkeys! 

But I digress. Point is, giving up cheese for many people is as difficult as going cold turkey for a 2-pack-a-day smoker. 

If you can’t picture a life worth living without cheese, I’ve got some good news. Thanks to a flaky, yellowish powder that looks just like sprinkled, crumbly parmesan on pasta, you can experience cheesiness without the dairy. That’s good news for people like me who feel bloated and weighed down after eating anything with dairy.

I’m of course talking about nutritional yeast, the darling of the vegan culinary scene. I’m not 100% vegan, but I have been using nutritional yeast for several years now. (I can’t believe I haven’t blogged about it until now.) 

In this post, I’ll discuss what nutritional yeast is and focus on its health benefits.

Why You Should Replace Regular Cheese With Nutritional Yeast

I don’t like being told what to do (ask my husband, Brandon) and I don’t like telling people what to do. So I’m not going to lecture about the evils of cheese and dairy and tell you that you should give up cheese. All I can say is that for many people, dairy tends to promote inflammation. 

But wait! What about the French? How do they get away with eating all that cheese and not suffer from the same chronic diseases endemic in American society? Ah, that’s what they call the French Paradox

While French eat plenty of cheese, they also eat a Mediterranean Diet and don’t snack all day like Americans. In traditional French society, people walk everyday and buy fresh, local, small-batch, artisanal foods. If you want to go ahead and eat some cheese here and there, fine. But if you’re not eating a Mediterranean Diet and living like the traditional French and other Mediterranean cultures do, then eating cheese is like pouring fuel on the inferno of metabolic disorders. 

If you eat plenty of fresh, local, organic produce and avoid processed foods, go ahead and enjoy a portion of pule. But if you’re like the average American who has trouble with controlling portion sizes and leading a mostly sedentary life, reduce your cheese intake. Start replacing regular cheese with “NOOCH.” 

What Is Nutritional Yeast?  

Nooch (not to be confused with booch) is the most common yeast in food fermentation. Afraid of getting a yeast infection? Don’t freak out. You won’t get one by eating nooch. Nonetheless, it is a yeast. But it’s not the same as brewer’s yeast that makes beer bubbly (and bad for your gut). It’s also not the same yeast that makes bread and baked goods rise. (Nooch doesn’t rise and it’s not doughy.) 

But the cheesy, nutty taste and mouthfeel will make your spirit soar because if you haven’t yet experienced it, you’ll be amazed by how much it tastes just like regular cheese. (I can’t say if it tastes specifically like donkey cheese because I’ve never tried pule.) 

I want to reiterate that nutritional yeast won’t contribute to an overabundance of harmful yeast in your gut. Sprinkling some nooch on farro, couscous, or other grain, or making a velvety faux-cheese sauce isn’t a recipe for having to do a Candida cleanse. To be sure, nutritional yeast is the same species as brewer’s yeast. But it’s a radically different product. Brewer’s and baker’s yeasts are active yeasts; nooch is an inactive yeast.

Not only is nooch cheesy, it also has an umami profile. If you’re not sure what umami is, it’s one of the five food tastes. There’s sweet, salty, bitter, sour and savory. Umami describes a rich, savory flavor. 

Health Benefits of Nutritional Yeast

I could regurgitate a bunch of nutrition facts like one tablespoon of nooch contains 17.6 micrograms of vitamin B-12. But you’ll probably forget these stats. What’s important to know is that nooch is one of the best sources of vitamin B-12 for vegans. B-12 is one of the hardest nutrients for the body to absorb. And if you don’t have good gut health, you’ll have a difficult time absorbing B-12, which is necessary for cellular energy. 

But the good news is that, at least according to an exhaustive study in the journal Nutrients, nutritional yeast seems to be good for the gut. I’ll get into that in a sec. 

Nooch also contains an impressive amount of protein, fiber, minerals and other B vitamins in just a small serving size. If you’re making, say, a big casserole, you’ll need more nutritional yeast, so you’ll get even more of the health benefits. 

The Nutrients study says nooch increases the absorption of minerals and helps detoxify mycotoxins. Mycotoxins are pathogens that grow on mushrooms. Nooch also helps lower cholesterol levels in the blood, and acts as an antioxidant. 

Nooch might be good for your gut because of its probiotic effects, says the study. It helps maintain the epithelial barrier integrity of the intestinal mucosa. What does that mean in plain English? It means like bone broth, it might be one of the best foods for preventing leaky gut.

Nutritional Yeast Probiotic

A while back, I wrote about traveling with kids. I revealed the best probiotic to take on your trip to prevent traveller’s diarrhea. It’s called saccharomyces boulardii. It’s actually not a bacteria like all other probiotics, rather it’s a yeast. S. boulardii is the only yeast that has been shown in research studies to benefit the good bacteria in your gut. 

Why am I mentioning this? Because research has shown that S. boulardii is virtually identical to Saccharomyces cerevisiae, aka nutritional yeast.

So while regular cheese can make the belly’s of lactose-sensitive people squirm, nooch seems to actually offer protection against inflammatory gut reactions. 

That’s the cherry on top for this cheesy topping that goes great on popcorn, sauces, soups, stews, and lots of other recipes

Warm Pumpkin Salad

This is a delicious fall treat for those first cool days that signal the end of summer. It’s very filling and makes you feel full even though it’s a salad. It’s also very healthy and vegan. – Veronica

pumpkin quinoa salad

Serving Size: 2-4 people

Ingredients

Warm Pumpkin Salad

  • 1 Tablespoon coconut oil
  • 1/4 cup diced sweet or yellow onion
  • 1 small pie pumpkin, skinned, seeded and chopped into 1/2 inch cubes
  • 1 clove garlic, minced or pressed
  • 1/2 teaspoon ground nutmeg
  • 1/2 teaspoon fresh thyme leaves
  • 1 cup cooked quinoa
  • Sea salt, to taste
  • Freshly ground black pepper
  • 4 cups wild greens (arugula, spinach, or mixed lettuces)
  • 1 cup pomegranate seeds

Directions

Warm the pumpkin: In a large non-stick pan, heat the coconut oil over medium heat. Add the diced onion and pumpkin. (The smaller the pumpkin is diced the more quickly it will cook.) Sauté the pumpkin and onions over medium heat for about 5 minutes, or until the squash is soft. Do not burn the pumpkin or onions.

Add the garlic, nutmeg and thyme, and cook for 1 to 2 minutes more. Transfer the pumpkin to a bowl and stir in the cooked quinoa. Add salt and pepper to taste. Cool mixture in the refrigerator for 15 minutes.

To serve, mix the dressing ingredients and drizzle over greens. Top with cooled pumpkin mix and garnish with pomegranate seeds. Serves 2-4.

Acai Bowl

Chef V tip: Try an acai bowl for breakfast, too!

Acai is a berry-like fruit native to the rain forests of the Amazon. It has a bitter taste and a very short shelf life, so we don’t often find them fresh in the store. Acai berries contain antioxidants, fiber, and heart-healthy fats.

acai bowl

Ingredients

  • 1 frozen unsweetened acai smoothie packet (I like Sambazon)
  • 1/2 cup frozen blueberries
  • 1/2 cup frozen raspberries or blackberries
  • 1/2 cup Chef V’s Raw Almond Milk
  • 1/2 cup fresh seasonal fruit (blueberries, raspberries, kiwi, peaches) use your favs!
  • 1 tablespoon shredded unsweetened coconut
  • 1/4 cup crushed raw almonds, optional

Directions

In a Vitamix, process frozen acai juice, blueberries, raspberries, and almond milk on medium until smooth. Transfer to a bowl and top with your favorite fresh fruit, coconut, and almonds, if desired.

Peaches & Cream Smoothie

June 21st is National Smoothie Day and National Peaches and Cream day so you know we had to make up a healthy Peaches and Cream Smoothie.

peaches & cream smoothie

Ingredients

Serves 2

  • 1 cup filtered water
  • 1/4 cup organic cashews
  • 1 cup frozen peaches
  • 1 tsp honey
  • 1 tbsp. vanilla pea protein
  • 1 dash of cinnamon (trust me!)
  • 1 cup ice

Directions

Blend the cashews with the water for one minute. Then add peaches and the rest of ingredients and blend for 1 minute.

Pour and enjoy. This recipe is perfect anytime this summer.

Vegan Ambrosia Salad from Chef V

Ambrosia salad is to die for Yum but also you might die from the ingredients! Yikes! Sugar on sugar on sugar! Oh wait, a little cream too! So, I’ve decided to remix this classic and make a yummy, healthy and vegan ambrosia salad.

vegan ambrosia salad

Ingredients

  • 2 different apples, diced (I choose one green and one honey crisp)
  • 2 cups pineapple, diced
  • 2 cups coconut cream or 2 cans coconut milk (Trader Joe’s has the cream)
  • 2 tbsp. raw coconut nectar
  • 1 tsp. vanilla bean or vanilla extract
  • 2 tbsp. unsweetened shredded coconut
  • ¼ cup chopped raw walnuts

Directions

Refrigerate the coconut cream overnight. If you don’t have coconut cream you can use canned coconut milk, you will just need two cans. For coconut milk, not cream, refrigerate the cans and when you remove, be careful not to shake the can as the cream is at the top. Carefully open the can and scrape out the cream from the top, the milky water will be at bottom. Don’t worry if you get a little bit of watery milk in cream just try to avoid it and get all cream. If you found coconut cream, you don’t have to do that step. You do need to refrigerate but just remove the cream in a bowl. Add coconut nectar and vanilla to cream and whip for 1-2 minutes.

Add apples, pineapple, walnuts and coconut shreds. Mix well. Chill for 2 hours before serving.

Warm Cinnamon Quinoa

Warm Cinnamon Quinoa is an IBS friendly recipe.
Chef V’s Tip: My fool-proof way to cook quinoa is to use a rice cooker. Place 1 cup uncooked quinoa and 2 cups liquid (either 2 cups filtered water or 1 cup filtered water and 1 cup unsweetened almond or coconut milk) in the cooker and set it on the white rice setting.
If you don’t have a rice cooker, place the quinoa and 2 cups of liquid in a medium-sized pot. Bring it to a boil, reduce the heat to medium, and cover with a tight-fitting lid. Simmer, covered, for about 15-20 minutes, or until all the water is absorbed. remove the pan from the heat, fluff the quinoa with a  fork and keep it covered until ready to use.
IBS Version of this Recipe
Only change to the recipe is to limit pecans to maximum 10 pecan halves.

vegan eggnog

Ingredients

    • 1 cup uncooked quinoa, rinsed and drained
    • 1 cup Chef V’s Raw Nut Milk (see recipe) or coconut milk
    • 1 cup filtered water
    • 1 tablespoon raw coconut nectar (I like Coconut Secret)
    • 1/2 teaspoon ground cinnamon
    • Optional Toppings
    • 2 cups fresh blackberries
    • 1/3 cup raw pecans, chopped

Directions

Cook the quinoa in a rice cooker or if cooking on a stovetop, follow the directions in the tip above, except simmer for 15 minutes, or until most of the liquid is absorbed. Turn off the heat and let the quinoa stand, covered, for 5 minutes. Stir in the coconut nectar and cinnamon.

To serve, spoon into bowls and top with blackberries and pecans.

Sweet Potato Holiday “Cookies”

sweet potato bunnies

Check out my little friend as we make a holiday version of my sweet potato bunnies. Holiday “cookies” remade to eliminate the sugar crazies – and she loved them!

Ingredients

  • 1 yellow sweet potato
  • 1 orange sweet potato
  • 1 purple sweet potato
  • 1 tbsp. coconut oil
  • Holiday Cookie Cutters
  • Sweet Topping
  • 1 tbsp. monk fruit or coconut sugar
  • 1 tsp. cinnamon
  • 1 tsp. ginger

slicing potatoes

Preheat the oven to 350 degrees. Slice the sweet potatoes thin and lengthwise. Arrange the sweet potatoes on a foil lined baking sheet, sprayed or painted with coconut oil.

Brush the tops of the sweet potato with coconut oil.

slicing potatoes

Shake the “cookies” with the cinnamon and monk or coconut sugar seasoning. Bake for 20 minutes. Remove and let cool.

slicing potatoes

Remove and let cool. Using a bunny cookie cutter, cut bunny shapes from the sweet potato.

slicing potatoes

You can replace in the oven for 10 minutes to crisp up more or just serve on a plate and enjoy these little bunnies!

Chef V’s Cranberry Sauce

So how do I make cranberry sauce healthy?  To sweeten the organic cranberries, I use coconut sugar. Coconut sugar is much better for your health because it doesn’t spike your blood sugar levels.

Take a look. Doesn’t it look just like the real thing? And in my opinion, my cranberry sauce tastes better than traditional Thanksgiving.

– Veronica

pumpkin pie

Ingredients

  • 1½ cups fresh or frozen organic cranberries
  • ½ cup raw coconut sugar
  • 1 tsp. organic lemon zest
  • 2 tbsp. filtered water
  • 1 tsp. organic sea salt

Directions

Add one cup of cranberries to a medium sized saucepan. Reserve ½ cup for later. Add the coconut sugar, water and lemon zest to the pan and cook over low heat for 10 minutes, stirring occasionally.

Increase the heat to medium-high and cook until the cranberries burst, about 10 more minutes. Reduce the heat and stir in the remaining cranberries for texture. Stir occasionally for 10 minutes. Remove from heat and add sea salt. Refrigerate for 3 hours or overnight.

Bon Appétit!

Chef V’s Easy Homemade Gluten-Free Oat Milk

nut milks

If you are allergic to nuts, my gluten-free oat milk recipe is a delicious alternative to my homemade nut milk.

Making your own oat milk is SO easy! All you need is a blender (I prefer Vitamix), cheesecloth or a nut milk bag, organic gluten-free oats and filtered water.

Cheese cloth is great because you get so much in one package, it’s so versatile, and you can use it on a million things (making nut cheese, poaching fish, nut milks, straining seeds from fruit, and lots more.) However, I bought a nut milk bag and it is so much faster and easier to use the nut milk bag.

I use oat milk in so many things. I cook with it any time a recipe calls for milk and no one can ever tell the difference. I also use it in my smoothies to make them creamy. You can add it to coffee or tea, cereal, or just have a refreshing glass with ice.

The milk will stay fresh about 3-5 days in the refrigerator. I keep them in mason jars, since each jar is about 2 cups and this recipe makes 4 cups. I use two jars so the milk stays fresher for use later in the week.

Once you try homemade oat milk it will be almost impossible to drink store-bought milk again, which is pumped with artificial crap to keep it fresh on the shelves.

The sad part is that a typical consumer would have no idea about what is inside of store bought oat milk or that it’s actually bad for you. The toxic ingredients found in commercial oat milks stress your immune system and weaken your health. The ingredients are also misleading and include words such as Vitamin A Palmitate, which can cause birth defects and bone fractures. Vitamin D2, which if taken in excess, can cause headaches, nausea, vomiting, abdominal cramps, muscle weakness and bone pain. But the worst thing about store-purchased oat milk is it usually doesn't even contain much oat!

In light of this, I suggest making your own nutritious and delicious oat milk. And the great part is, it’s really easy!

INGREDIENTS

  • 1 cup gluten-free oats
  • 2 cups water, for soaking
  • 4 cups cold filtered water, for blending
  • High power blender (I prefer Vitamix)
  • Nut Milk Bag or Cheesecloth

INSTRUCTIONS

Soak the oats in 2 cups of water for 30 minutes. Drain the oats. Add oats and 4 cups of cold water to blender and blend on high for 2 minutes. Pour the oat mixture into the cheesecloth or nut milk bag. Squeeze out excess milk. Pour into mason jars or a milk jug.

Use Chef V’s Oat Milk right away or it keeps for 3-5 days refrigerated. Shake before use.

You can add some oat milk to your Green Drink to make it a little creamy. Yum!

Easy Cereal with Chef V’s Nut Milk

Chef V’s Tip: My Raw Nut Milk is easy to make and so versatile; I use it throughout my cookbook. Or, an ice-cold glass of it is refreshing on a hot summer day.

vegan eggnog

Ingredients

CHEF V’S RAW NUT MILK

  • 3 cups raw almonds, cashews, hazelnuts, or macadamia nuts
  • 3 cups filtered water

CEREAL

  • 1/2 cup Chef V’s Raw Nut Milk or coconut milk
  • 1/4 cup crushed raw almonds
  • 1/4 cup crushed raw walnuts
  • 1/4 cup fresh blueberries
  • 1 tablespoon unsweetened shredded coconut

Directions

To make the nut milk, process 3 cups of raw nuts and 3 cups of filtered water in a Vitamix until liquified. Strain through a cheesecloth into a mason jar and seal. Will keep for up to 3-5 days refrigerated.

To make the cereal, combine all the ingredients in a bowl and serve.

Chia Seed Pudding

Chia seed pudding is great for breakfast, and kids love this recipe. Chia seeds are tiny superfood heroes. They come in either white or dark brown/black and have a huge nutritional profile. The contain Calcium, Manganese, and Phosphorus, and are packed with fiber, protein, and healthy omega-3 fats. They are basically tasteless so you can add them to nearly any kind of dish.  – Veronica

chia seed pudding

TOTAL TIME: 30 Min

Ingredients

  • 1 cup chia seeds
  • 2 1/2 cups Chef V’s Raw Almond Milk
  • 1 tablespoon raw coconut nectar (I like Coconut Secret)
  • 1 teaspoon pure vanilla extract
  • 1/2 teaspoon ground cinnamon, optiona
  • Pinch sea salt

OPTIONAL TOPPINGS
Fresh fruit, dried fruit, shredded unsweetened coconut, raw nuts

Directions

Place all of the ingredients except for toppings in a bowl and stir until well combined.

Let the mixture sit for 5 minutes, then stir with a fork. Repeat this process every 5 minutes for about 30 minutes, or until the chia seeds have soaked up all the liquid.

Chill pudding for 2 hours before serving. Top with your favorite garnish and dig in.

Goji Berries: Health Benefits and Chef V’s Trail Mix Recipe

Chef V Goji berry recipes

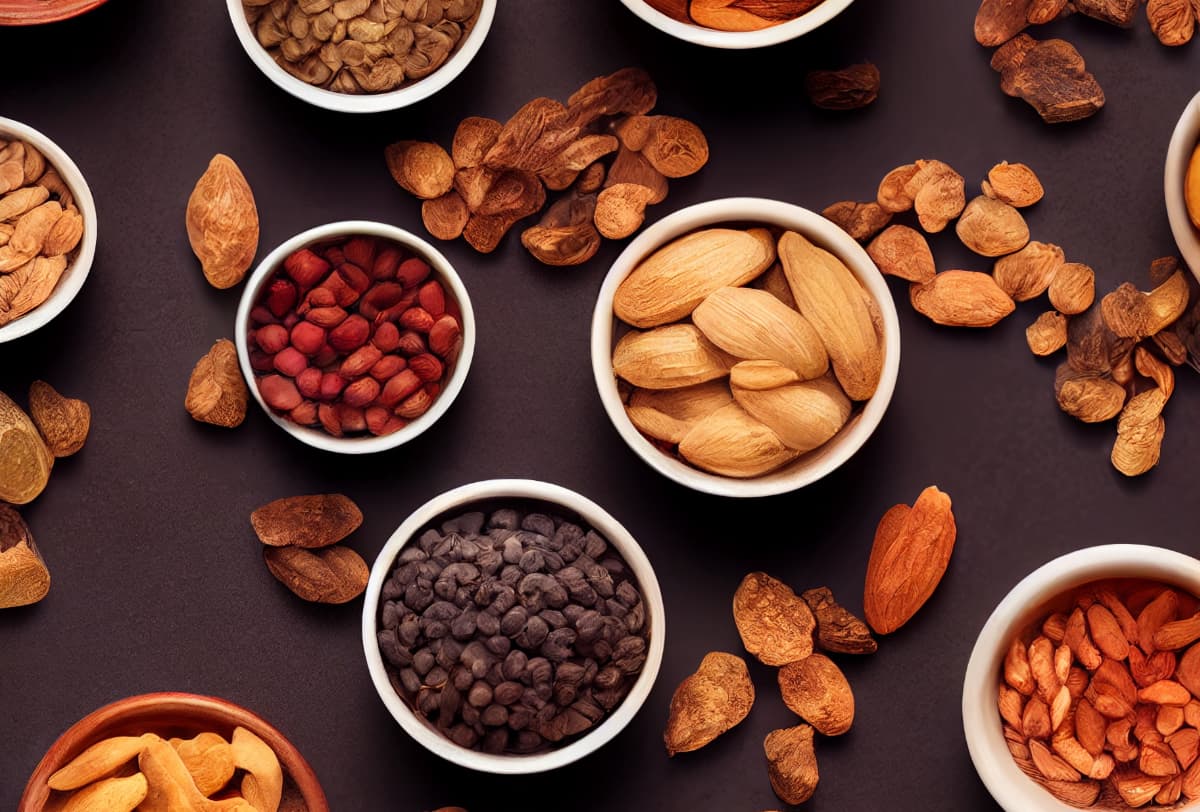
Trail mix is a healthy alternative to sugary commercial candy, loaded with artificial ingredients. My recipe includes super healthy goji berries, nuts and seeds.

Goji berries have been have been used in China and other Southeast Asian countries for more than 2,000 years. Both as a traditional medicinal herb and as food. But it’s only been about a decade since goji berries have caught on in the US. Especially in the yoga and natural health community. Yes, it’s true that some consider goji berries trendy, not to mention expensive.

But if you have the budget to treat yourself to goji berries, I strongly believe they are worth the money. (A bag of them costs about $10-$12 at a natural food market.) That’s because the health benefits of goji berries are impressive.

If you’re interested in learning about goji berry health benefits, keep reading. But if you’re only here for my Easy Trail Mix recipe, which is featured in my book, Making Cleansing Easier, I’ll indulge you.

Before I share the recipe, allow me to briefly share my inspiration for creating the recipe….

Making Your Own Healthy Snacks

One of the things I love about living in San Diego (besides the climate) is that not only am I within striking distance of the beach, but beautiful hiking trails as well. And when I go for a hike, I like to bring healthy snacks with me. And what better snack to bring on a long steep hike than trail mix….

Sure, I could go to the market and buy a bag of trail mix. But no thanks, I don’t want a bag that’s half filled with raisins. No offense, raisins, a handful of you is ok. But no more than that. This is why I like making my own healthy snacks. In this way, I control the ingredients and the flavor.

That being said, let me introduce to you my recipe for Easy Trail Mix. And make sure to stay tuned after the recipe to learn about the all-star ingredient, goji berries….

CHEF V’S EASY TRAIL MIX

My Tip:

Try different ingredients to create some fun mixes. I generally use one or two raw nuts, one seed, and one dried fruit. Some ideas for nuts: almonds, walnuts, pistachios, cashews, pecans, or macadamia nuts. For dried fruit, always choose unsweetened and unsulfured fruits. My favorites include pineapple, apple, mango, and blueberries. And, of course, goji berries.

Ingredients:

1 cup raw almonds

1 cup raw walnuts

¼ cup unsweetened dried Goji berries

¼ cup raw sunflower seeds, sprouted if available

Directions:

Combine all the ingredients in a resealable bag or a bowl. I keep a bag in my car and a bowl handy in the house for easy and healthy munching wherever I am.

Goji Berries Health Benefits

I’m no expert in traditional Chinese medicine (TCM) . But I do find it fascinating. How did those ancient sages come up with the concepts of acupuncture and meridians? And how did they figure out how individual herbs affect specific organ systems? It’s mind-boggling. According to TCM, goji berries (Gou Qi Zi in Chinese) nourishes and tonifies the liver, kidneys and lungs. It also improves life essence (a concept in TCM called “Jing”) and enhances vision. Another health benefit of goji berries from a Chinese medicine point of view, they help balance yin and yang energies.

But goji berries also have the backing of modern research studies. And some of this research confirms what Chinese herbalists have known for over 2,000 years. Specifically, that goji berries help fight premature aging.  

Also known as wolfberry, goji berries, according to this research, show antitumor activity against various types of cancer cells and inhibit tumor growth. Moreover, they help normalize blood sugar levels and encourage insulin sensitivity. That’s great news if you have type 2 diabetes. The more sensitive to insulin you are, the less of it you need. Goji berries, says the research, increases glucose metabolism. And it turns out goji berries also benefit those with type 1 diabetes. That’s because the promote insulin secretion. In addition, they help make the cells in the pancreas that release insulin (beta cells).  

It also turns out that the ancient Chinese knew what they were talking about when it comes to goji berries benefitting the eyes. Research shows they protect cells in the retina against glaucoma.

Goji Berries: More Health Benefits

The compounds in goji berries also protect the liver. They do this by helping the liver detox, even from exposure to toxic chemicals. They also help reduce toxicity caused by radiation or chemotherapy.

And although promising research studies using mice doesn’t mean the benefits will occur in humans, it’s encouraging to see that goji berries may help prevent neurological diseases. The compounds in them lessen the symptoms of mice with Alzheimer's disease. Goji berries also help improve memory and cognitive abilities.

Here’s another goji berry health benefit I especially want my husband, Brandon (who helps me run ChefV.com), to pay attention to: better sperm health. You see, I may want kids one day. And it turns out that goji berries are beneficial to male reproduction. They increase the quality, quantity, and motility of sperm. The research also states that goji berries improve sexual performance. (Not that you need to eat goji berries for this reason, hubby! [wink]) And finally, in the bedroom department, goji berries help protecting Brandon’s own precious berries against what researchers call, “toxic insults,” whatever those might be. (Perhaps radiation from having your laptop on your crotch?)

Goji Berries: Worth the Price!

While it’s true that goji berries seem to some like an elitist superfood, as you can see the health benefits are tremendous. The berries also help fight body fat accumulation, protect the heart, and fight viruses and inflammation.

Sure, other fruits might be cheaper and offer antioxidant protection against disease and aging. But few fruits offer all of these impressive health benefits. Plus, goji berries are high in fiber, iron, calcium, and vitamins A & C. But don’t go overboard with them. Just eat a handful. Goji berries contain lots of fruit sugar.

Pumpkin Lasagna & Rosemary “Ricotta”

Pumpkin Rosemary Ricotta

PREP TIME:
TOTAL: 1HR

Serving Size: 2-4 People

INGREDIENTS

Ricotta Rosemary

    • 1-cup macadamia nuts- soaked for an hour
    • ½ lemon juiced
    • 1 tsp. organic sea salt
    • 1 tbsp. fresh chopped rosemary
    • 2 tbsp. pure organic pumpkin puree
    • 1 tbsp. cold pressed olive oil

Pumpkin Sauce

  • 1 tbsp. organic cold pressed olive oil
  • 1 white onion, diced
  • 1-cup shredded organic carrot
  • 2 garlic clove, minced
  • 1 tbsp. organic rosemary, chopped
  • ¼- cup organic parsley, chopped
  • ½-cup organic basil, slivered
  • 2 cups pure organic pumpkin puree
  • 1-cup filtered water
    ¼ cup organic unsweetened almond milk
    1 tsp. organic sea salt
    ½ tsp. black pepper

Noodles

  • 1 box of gluten-free (brown rice or quinoa) lasagna noodles (about 6 whole lasagna noodles needed)

INSTRUCTIONS

Blend “ricotta” ingredients together in a Vitamix or food processor, slowly pouring the oil while blending. Blend until smooth like a ricotta texture. Scrape mixture out with a spoon into a bowl. Refrigerate while making the sauce.

Turn oven on to 350 F. Bring a large pot of water to boil (large enough that the lasagna noodles will fit in without bending). Heat oil in a medium saucepan over medium-high heat. Add onion and sauté for 2 minutes. Add carrot and sauté an additional 2 minutes. Add garlic, rosemary, basil, and parsley. Add Pumpkin puree, water, almond milk, salt and pepper. Bring to a simmer for 10 minutes.

While simmering, cook lasagna noodles for 5-10 minutes (According to box directions).

When done, line a 8” x 4” baking dish with ¼ cup of sauce on the bottom, 2 layers of noodles, ¼ cup sauce, ¼ cup ricotta, 2 noodles, ¼ cup sauce, the rest of ricotta, 2 more noodles on top, cover with sauce and bake, uncovered, for 20 minutes or until hot.

Pumpkin Lasagna & Rosemary “Ricotta”  Bon Appétit!

Poached Pear with Gluten-Free Crumble & Vegan Ice Cream

Although alcohol is not recommended for cleansing, this recipe cooks out any of the alcohol and makes this a decadent dessert. You can always omit the champagne and use any liquid, even water, for this recipe.

poached pear

TOTAL 80 minutes

Serving Size: 6 people

Ingredients

  • 1 cup champagne or other liquid
  • 3 pears (d Anjou, Bartlett, Asian) halved and scooped with melon ball 
  • 1 tbsp honey 
  • 1/2 cup gluten-free flour 
  • 3/4 cup gluten-free oats 
  • 1/4 cup coconut sugar 
  • Pinch sea salt 
  • 2 tsp vanilla 
  • 3 tbsp vegan butter 
  • Vegan ice cream to serve 

poached pears in oven

Directions

Preheat oven 375 F. Mix honey and champagne together.

In a shallow baking pan lined with foil, lay the scooped pears on the pan, skin side down. Pour champagne mix to cover. Cover with foil and bake 10 minutes. Add another 10 minutes if pears are not ripe.

While pears bake, mix flour, oats, sugar, salt, butter and vanilla.

Remove pears and foil. Top evenly with crumble. Continue to bake, uncovered, for 20 minutes or until the crumble is golden brown. Remove pears.

Serve on a plate with scooped vegan ice cream. Enjoy this delicious and healthy dessert! 

These 6 Spice Ingredients Prevent Belly Bloating & Improve Digestion

spices for health at the holidays

If variety is the spice of life, I say a variety of spice ingredients is the key to a long, healthy life. Herbs and spices improve digestion, reduce inflammation, and may even prevent cancer, along with other benefits. I’ll share with you my favorite 6 herbs and spices for optimal digestive health.

Feeling a little bloaty and gassy? Having a hard time buttoning your jeans? The 6 ingredients – herbs and spices – I’m about to share with you can dramatically improve your digestion. These spices are so good for you I recommend using them every day.

Dandelion

Did a rich dessert back your system up? Then sip on some dandelion tea. The reason why is dandelion root is really good for relieving constipation. Not only that, it reduces the amount of time food sits in your belly. In fact, one study suggests it’s better than a drug at speeding up digestion.

And if you’re a little down in the dumps because you put on a couple pounds, here’s how else ingredients like dandelion help….

When we overindulge, it’s really easy for water and metabolic waste to accumulate in our digestive system. But dandelion comes to the rescue by acting as a diuretic, removing excess water from your gut.

dandelion

Turmeric

Is it me or is turmeric becoming more popular than ketchup? Turmeric has been blowing up the Internet because of its inflammation-fighting and blood-sugar lowering actions. But did you know it’s also great for digestion? Here’s why I love adding ingredients like turmeric spice to my smoothie, tea and meals….

Sometimes when we’re invited to a dinner party and eat something we don’t normally have, toots happen. It’s a part of life. Nonetheless, flatulence is embarrassing. But turmeric is a potent fart-fighter! The very uncomfortable post-meal combo of gas and bloating can be greatly reduced just by adding a teaspoon or two of turmeric.

Turmeric may prevent embarrassing gas and uncomfy bloating because it helps digest fats. It also helps your belly keep its supply of stomach acid. Many digestive problems are caused by not having enough digestive juices to break down food.

I realize it might not be practical for you to carry a bottle of turmeric spice in your purse to a dinner party. But you can easily drink some tea or a smoothie before you head out for the night. You can also take a turmeric supplement before the dinner party.

Keep in mind turmeric is fat-soluble. That means you need to consume a little fat in order for your body to absorb turmeric. That’s not a problem if you’re adding it to a meal. But if you’re having a smoothie, make sure you add a tablespoon of olive oil or other healthy fat.

My next favorite spice for digestion also helps your body absorb turmeric….

turmeric

Black Pepper

Without black pepper, your body doesn’t absorb turmeric very well. But adding just a pinch or two of this ingredient, fresh ground black pepper, can increase your body’s absorption of turmeric by 2,000%!

Not only that, there’s something in black pepper called piperine, which is great for digestion. It helps you break down all the tryptophan and other amino acids in holiday turkey. It also helps you get rid of excess water and it stimulates your belly’s release of hydrochloric acid, the main digestive juice in your gut.

But to get your belly feeling better with black pepper, don’t cook with it. Just sprinkle some fresh ground pepper corns in your tea or on your food.

black pepper

Ginger

ingredients: Ginger is Mother Nature’s weapon against indigestion, stomach pain and nausea. When I go for sushi, I always ask for extra ginger. Not only does it cleanse the palette in between bites of a rainbow roll, it’s also great for digestion. It helps move food through the digestive tract so all that rice and fish in the sushi doesn’t just sit in your gut for hours, leaving you bloated and gassy.

Here’s an easy digestion hack you can try with ginger that’s been used for thousands of years in India’s ancient traditional system of medicine (Ayurveda): try eating some fresh ginger slices about a half hour before your meal. This will activate your digestive fire. Or better yet, have a cup of ginger tea.

(If you take a blood-thinning drug, don’t use too much ginger as it can negatively interact with the medication.)

ginger root

Cardamom

I do love me a cup of low-sugar chai tea. Each sip delightfully awakens my taste buds. But more than that the ingredients in chai tea like cardamom are great for digestion. Cardamom is like ginger’s cousin. Like ginger, it can help prevent gas and bloating. There’s also some research that shows it can help if you have IBS (irritable bowel syndrome). Not only that it can help if you have belly cramps, diarrhea or constipation.

If your bottle of cardamom spice is gathering dust in your pantry, move it to front and center of your spice rack. And if your local coffee shop can do a low-sugar chai spice tea, go for it. Besides cardamom and cloves, traditional chai spices also include ginger  black pepper, and cinnamon.

Speaking of which, here’s the final of my favorite spices for digestion….

cardamon

Cinnamon

Cinnamon is an ingredient miracle. Not only can it make bland oatmeal taste great, it’s also good for digestion. It can help with indigestion, gas, heartburn, nausea and stomach cramps. Now, obviously, sprinkling cinnamon on stuffing, turkey or mashed potatoes is … let’s just say, weird.

But what you can easily do, if you know you’re going to be indulging, before you head out for the big holiday meal, is make a cup of tea and sprinkle some cinnamon in it. Or, you can make yourself a cup of Golden Milk.

Golden Milk (click here for my recipe) is a dairy-free drink that I make with almond milk and features several of the spices above. My recipe for Golden Milk includes turmeric, ginger and cinnamon, and of course, a pinch of fresh ground black pepper.

If you’re going to indulge a little, no worries, you’ll get back on track. Just make sure to start using these spices every day to help you digest those heavy meals.

Love,

Veronica (Chef V)

P.S. Having a daily 16 oz. serving of my Green Drink will also do wonders for your digestion. That’s how I start my day, even on the holidays.

Brandon, veronica and Coco

Vegan Tiramisu – Guilt Free Decadence

While we typically recommend steering clear of sugary treats, this healthy take on tiramisu is a must!

Take a look at the ingredients listed below before you start the process – some might be new to you but don’t let that stop, we’ve included links to some of our favorite products to help guide you at the grocery store.

Plus, once you start baking and cooking with these healthy ingredients, there’s a good chance you’ll want to continue! For instance, using coconut sugar is better for you then real cane sugar as it’s low in fructose and higher in antioxidants than cane or brown sugar. And it tastes great too!

vegan tiramisu

vegan tiramisu

TOTAL: 1 hour

Serving Size:2

Ingredients

Lady Fingers
2 ½ cups all purpose gluten-free flour (we like Bob’s Red Mill)
1 cup coconut sugar
3 tsp. baking powder
2 tsp. vanilla
1/3 cup coconut oil
1 cup filtered water
Cooking spray (we like Trader Joe’s Coconut Oil Spray)
Square baking sheet

‘Mascarpone’ Filling
2 cups raw cashews, soaked for 2 hours, drained
1 can coconut cream (we use one from Trader Joe’s)
1 ½ tsp. organic vanilla or vanilla bean
2 tbsp. coconut nectar
1 tbsp. cold water (add more as needed)

Assembly Needs:
6 small glasses ( martini or wine glasses or 4 mason jars)
1 cup coffee (use decaf if you are cleansing)
6 tsp cacao powder (use 1 tsp. per glass)
Cacao nibs (optional) topping

Directions

Preheat oven to 350 degrees.

Mix dry ‘lady finger’ ingredients together.

Add oil, vanilla and water. Stir until lumps are gone. Pour the mix in a large oiled square pan.

Cook for 12 minutes or until the cookie mixture is lightly golden. Let the cooked mixture cool then cut into lady finger shaped rectangles (approximately 1” x 3”).

While the cookies are cooling, make the ‘mascarpone’ filling.

Blend the cashews, vanilla, coconut nectar and water together in Vitamix (or blender) on high until it becomes a creamy consistency. Add the coconut cream and cashews to a large bowl. Whisk together until the mixture is smooth and creamy.

Once the cookies are completely cool, pour the coffee into a shallow glass. Dip each lady finger cookie into the coffee. Start to layer the bottom of your dish with cookies, then cream and repeat. The top layer should be all cream with a layer of cacao powder. Add the cacao nibs for extra deliciousness if you’d like.

© 2021 Chef V, LLC.